Design 1

AutocaDesigner

Design 2

AutocaDesigner

Design 3

AutocaDesigner

Design 4

AutocaDesigner

Design 5

AutocaDesigner

Showing posts with label Advanced features. Show all posts
Monday, 21 September 2015

You want to view an AutoCAD drawing but you don't have AutoCAD installed in your pc? Even worse if you want to plot a DWG or even publish it. You don't have to worry anymore, Autodesk has given a solution to this problem. You may download a free program called True View. With this program you can view, plot and even publish any DWG files. The download link is provided below for you. Enjoy!
Download link of TrueView

Thursday, 17 September 2015

Time is money, so stop wasting it. In order to save time we can use shortcuts in AutoCAD. Bellow there are the most common AutoCAD shortcuts that will make your life easier. Enjoy.
MOST COMMON AUTOCAD COMMANDS

SHORTCUT
COMMAND
COMMENT
A
ARC
Draw an arc
AL
ALIGN
Align an object with another
AP
APPLOAD
Opens application load dialogue box
AR
ARRAY
Opens array dialogue box
AUDIT
AUDIT
Audit drawing for errors
AV
DSVIEWER
Opens ariel view of drawing
B
BLOCK
Opens block dialogue box
C
CIRCLE
Draw a circle
CO
COPY
Copy an object
CHA
CHAMFER
Chamfer between 2 non-parallel lines
COL
COLOR
Opens select color dialogue box
CUI

Opens customize user interface dialogue
D
DIMSTYLE
Opens dimstyle manager
DC
ADCENTER
Opens designcenter
DI
DIST
Check a distance
DIV
DIVIDE
Inserts point node a set division
DO
DONUT
Draw a solid donut shape
DV
DVIEW
Perspective view
E
ERASE
Erase a selection
EX
EXTEND
Extend a selection
F
FILLET
Draw an arc between 2 intersecting lines
FI
FILTER
Opens filter dialogue box
FLATTEN
FLATTEN
Converts 3D to 2D
G
GROUP
Launches the group dialogue box
H
HATCH
Opens hatch and gradient dialogue box
I
INSERT
Insert a block
IM
IMAGE
Launches image manager
J
JOIN
Joins 2 objects to form single object
JPGOUT
JPGOUT
Creates a JPEG file of current drawing
L
LINE
Draw a line
LA
LAYER
Opens layer manager
LE
QLEADER
Draw a leader line (may need to adjust settings)
LEAD
LEADER
Leader line with annotation
LI or LS
LIST
Display information about objects in a text window
LO
-LAYOUT
Creates a new layout tab
LTS
LTScale
Change the linetype scale
M
MOVE
Move a selection
MA
MATCHPROPERTIES
Match properties of an object
ME
MEASURE
Inserts point node at input distance
O
OFFSET
Offset a selection
OP
OPTIONS
Launches options dialogue box
P
PAN
Pan in drawing
PE
POLYEDIT
Edit a polyline
PL
PLINE
Draw a polyline
PLOT
PLOT
Opens plot/print dialogue box
PO
POINT
Point marker or node - DDPTYPE to change point style
PR
PROPERTIES
Opens properties dialogue box
PRE
PREVIEW
Preview a plot
PU
PURGE
Opens purge dialogue box to remove unused elements
RE
REGEN
Regenerate the display
REC
RECTANG
Draw a rectangle
REN
RENAME
Opens rename dialogue box to rename blocks, layers, etc
RO
ROTATE
Rotate a selection
SP
SPELL
Spell check a selection - ALL to check entire drawing
T
MTEXT
Insert multiline text
TB
TABLE
Opens insert a table dialogue box
TP
TOOLPALETTES
Displays toolpalette
TR
TRIM
Trim a selection
U
UNDO
Undo last command
UN
UNITS
Opens units dialogue box
V
VIEW
Opens view dialogue box
W
WBLOCK
Write a block


source:homemicro

Do you want to have a smaller dwg file? Do you want to have a cleaner design? You simply have to use the following AutoCAD commands.

AUDIT
The audit command will search and find any errors in your drawings and fix them.
PURGE
Using this command will get rid of any blocks, styles that you don't actually use. However you have to pay attention if you want to use them later on.

OVERKILL 
By using the overkill command you can delete any duplicated lines.

Saturday, 6 July 2013

For all of you perfectionists, who want to add something extra to your AutoCAD designs, there is a solution: Photoshop. In this two part tutorial, I will demonstrate how easy it is to setup AutoCAD plotter and then import your drawings into Photoshop.


The first thing to do is to type Options in the command line. A pop up menu will appear. We then select Plot and Publish tab. From there we have to click on Add or Configure Plotters.

Figure 1 - Options Menu

We will be transferred to a new file window as shown below. 

Figure 2 - Plotter Wizard

From there we have to choose Add a plotter wizard. Click next twice.


Figure 3 - Plotter Model

Select Raster File Formats in the Manufacturers list and then select the Portable Network Graphics PNG (LZH Compression) option in the Models list as shown in Figure 3.

For the next step you have to click next twice.

In the next window select Plot to File (Figure 4) and then next.

Figure 4 - Ports

In the next step you may change the name of the plotter.

Figure 5 - Plotter Name


In the last step click finish in order to complete the process.


This process has to be done once in order to export AutoCAD drawings to Photoshop.


Monday, 10 June 2013

Let's say that we want to add text in our drawing. There is an easy way to create a new single line style and customise it until we are pleased.


The first thing to do is to open our drawing and go to annotate on the ribbon menu.

Figure 1 - Annotate Menu


At the down right corner there is an arrow that opens the text style menu.

Figure 2 - Text style menu

At this point we can see that the only available style is the standard one. So, we have to create a new style by pressing the New button. After we have chosen a name for our new style, then we can customise text style until we are satisfied.

In our example, we want to have a specific height for our text. So, every time we add text, the height will be predefined. 

  • Height of the text is set to 0.3
  • Font style is changed to Bold.
  • Apply, Set current.
 From the annotate ribbon we can see the multiline button. By pressing it, single line text is revealed.

Figure 3 - Selecting Single Line Text


When we have selected where to place our single line text the program skips the part where we have to specify the text height because it is predefined. However, we still have to specify rotation angle of text as shown below.

Figure 4 - Adding Text

In this case we write GROUND FLOOR and then we press enter twice to exit from text edit menu.

Figure 5 - Mission Accomplished


Thursday, 6 June 2013


Figure 1 - Quick Selection icon
Presenting a quick & effective way to select objects, blocks etc. in AutoCAD.  
Quick selection is an underrated command that can save us time.

Quick selection button can be found on the utilities menu, on the home tab.


Let's say that we are working on the drawing like the one shown below.
Figure 2 - Ground Floor
As you can see there are six trees at layer 0 and we want to select them and move them into the appropriate layer. Instead of picking each & every one of them (in this case is six but in other cases we may need to select 20, 30, etc.) we will select them all in once.


Figure 3 - Quick selection's pop up menu
Step 1: Click Quick select icon,
Step 2: Select Block reference, from the Object type drop down menu,
Step 3: Select Name from properties,
Step 4: Choose the block that you need to select. 
In this case --> Tree Round.


As you can see all the needed elements are selected by following 4 easy steps. The next thing to do, is to place them in their proper layer.
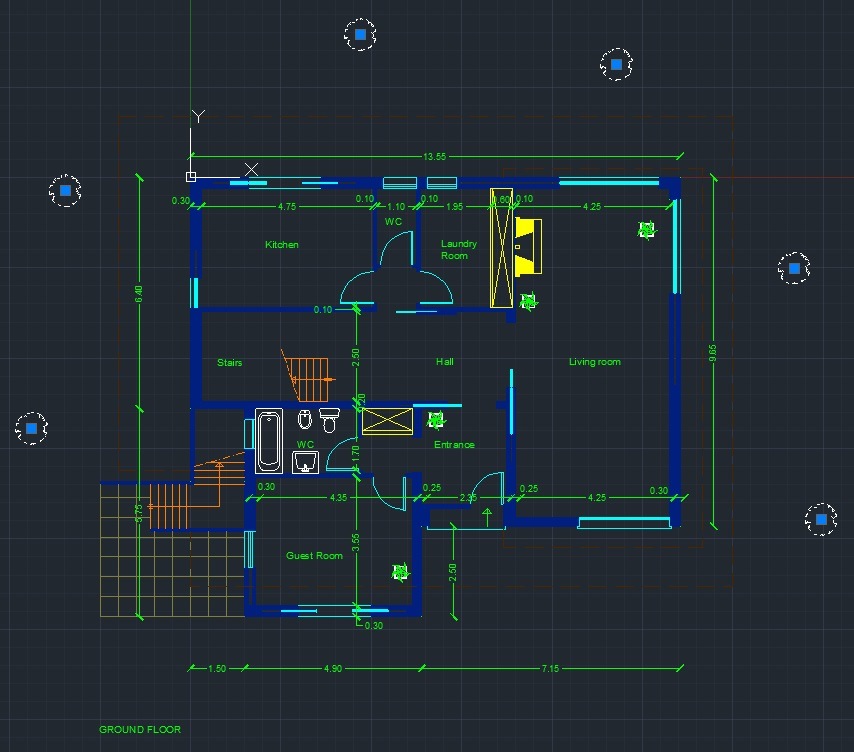
Figure 4 - Selection of trees


At this point all we need to do is to select the trees layer in order to place the trees block into the correct layer.

Figure 5 - Moving trees to the proper layer


Join us on Facebook

Please wait..10 SecondsCancel
Powered by Blogger.

Translate

Greek Bulgarian Romanian Spain Italian https://s18.postimg.org/g0usrx6mx/flag_portugal.png

Popular Posts

Find us on Facebook

Followers

Total Pageviews

Tags

AutocaDesigner © 2013 Supported by Best Blogger Templates and Premium Blog Templates